Unlike the policy embed codes, the Usercentrics consent solution embed code must be pasted into the the header section of your website and before any other 3rd party scripts that you may be using (such as Google Analytics or Facebook Pixel).
The instructions below outline how to implement the Usercentrics consent solution to ensure you are getting consent from your visitors prior to Shopify tracking the users for non-essential purposes (such as analytics purposes).
Stage 1: Set up your Termageddon license for Shopify (adding Shopify Services + enabling V3 consent solution)
Log in (policies.termageddon.com)
Click into your license
Click Edit for the Cookie Policy and Consent Tool
Scroll to the very bottom, click “Add Service” -> “PreDefined”
Here are the 3 pre-defined Services you need to add:
“Shopify Analytics”
“Shopify Marketing”
“Shopify Preferences”
After you add a Service, click the “Add Service” button at the bottom of the modal. Then click ‘Add Service’ to add in the next one.
Click Save and Exit
Now click this link below and follow the steps to activate V3 of the consent solution:
You have now set up the Shopify pre-defined Services along with enabling Usercentrics V3. You also get full CSS control of your consent banner now with V3. Proceed to Stage 2.
Stage 2: Add the Shopify Consent Tracking Script along with your V3 Usercentrics Script
Disable the Shopify consent solution if currently enabled.
Log into Shopify and click the settings icon in the bottom left corner
On the left hand column click Customer Privacy
Click Cookie Banner
Under “More Actions” dropdown, select the option to delete the cookie banner
In your theme.liquid file, remove the default Shopify Consent Tracking API
Log into Shopify and click Online Store in the left column
Next to your website, click the 3 dots and click “Edit Code”
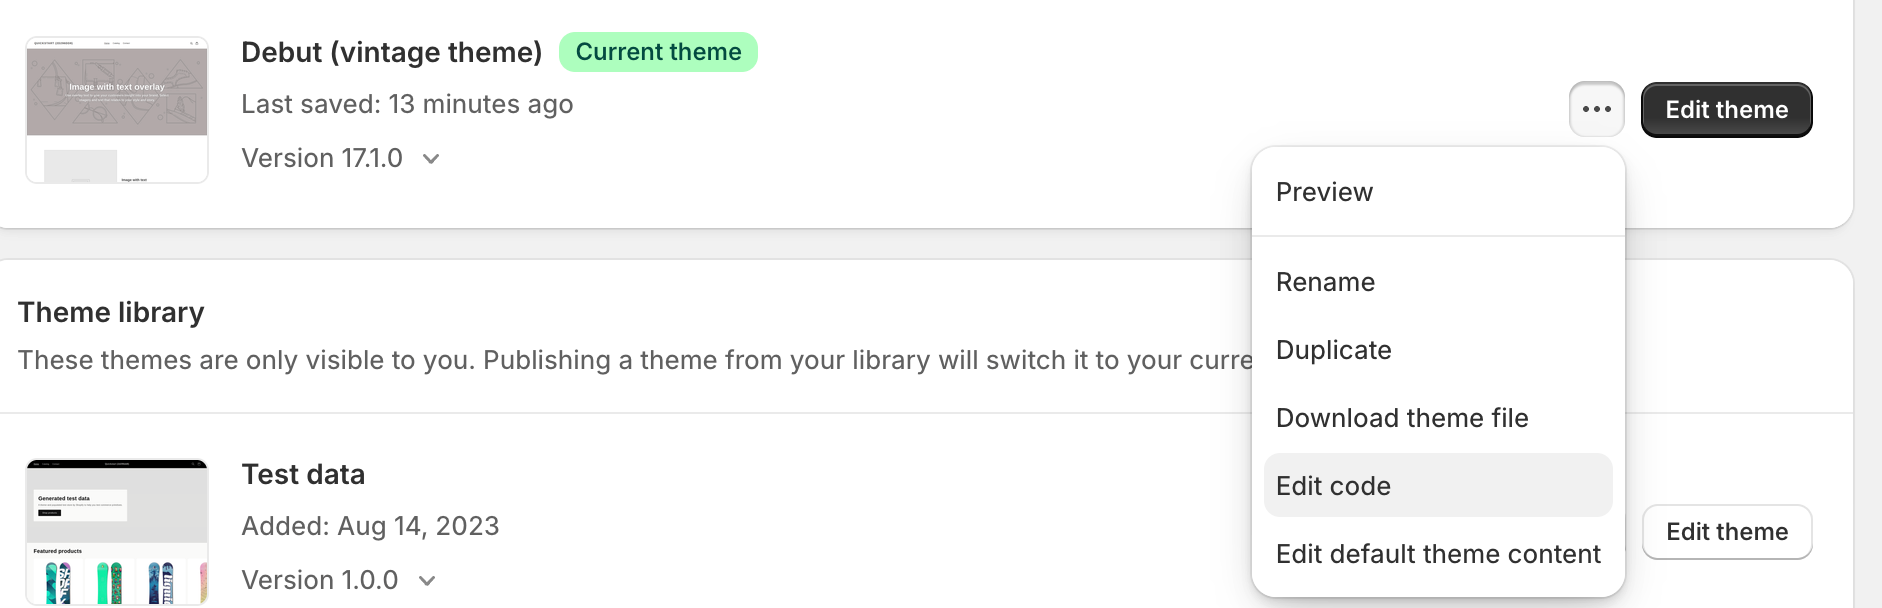
Under Layout, click Theme.Liquid
Locate the current Consent API script. Remove the script (meaning you remove everything from <script> to </script>. Do not delete </head>.). You should consider saving a local copy of this code prior to deleting it just as a general best practice.
Here’s what this first part of this script looks like. This will be around line ~114 of your website most likely:
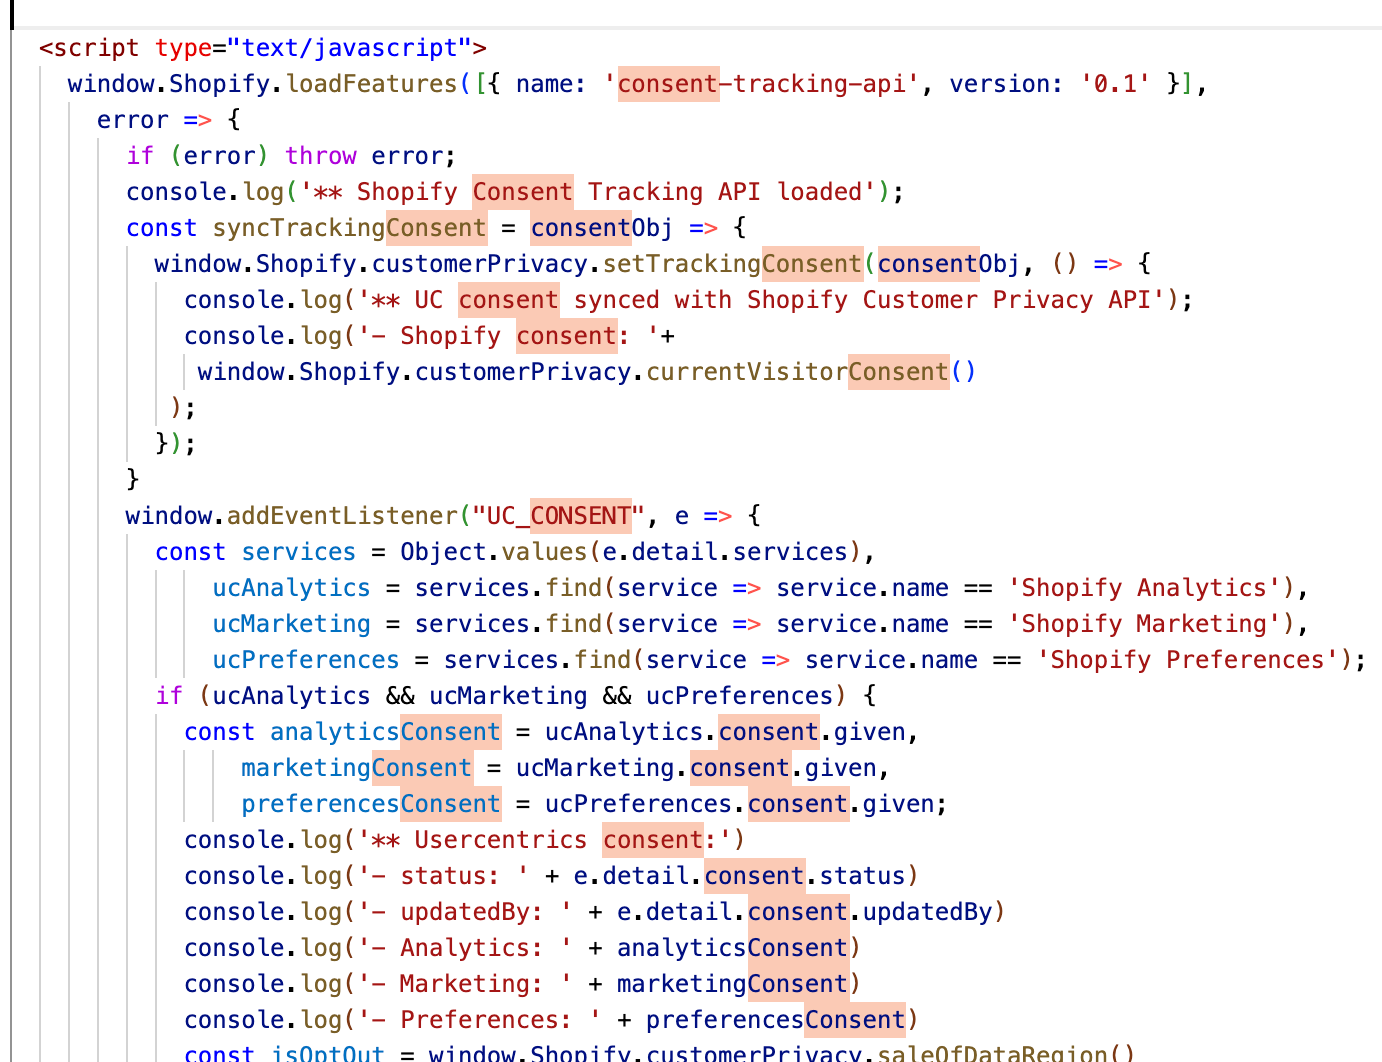
Copy/paste the code below, right before the </head>
 <!-- Usercentrics Consent Tracking Script -->

<script type="text/javascript">

     window.Shopify.loadFeatures(

       [{ name: 'consent-tracking-api', version: '0.1' }],

       error => {

         if (error) throw error

         console.log('** Shopify Consent Tracking API loaded');

         const syncTrackingConsent = consentObj => {

           window.Shopify.customerPrivacy.setTrackingConsent(consentObj, () => {

             console.log("** UC consent synced with Shopify Customer Privacy API")

             console.log("- Shopify consent:")

             console.log(window.Shopify.customerPrivacy.currentVisitorConsent())

             console.log("--------------------------")

           })

         }

         window.addEventListener("UC_CONSENT", e => {

           const services = Object.values(e.detail.services)

           const ucAnalytics = services.find(service => service.name == 'Shopify Analytics')

           const ucMarketing = services.find(service => service.name == 'Shopify Marketing')

           const ucPreferences = services.find(service => service.name == 'Shopify Preferences')

           if (ucAnalytics && ucMarketing && ucPreferences) {

             const analyticsConsent = ucAnalytics.consent.given

             const marketingConsent = ucMarketing.consent.given

             const preferencesConsent = ucPreferences.consent.given

             console.log('** Usercentrics consent:')

             console.log("- status: " + e.detail.consent.status)

             console.log("- updatedBy: " + e.detail.consent.updatedBy)

             console.log("- Analytics: " + analyticsConsent)

             console.log("- Marketing: " + marketingConsent)

             console.log("- Preferences: " + preferencesConsent)

             const isOptOut = window.Shopify.customerPrivacy.saleOfDataRegion()

             console.log("** is using Opt-Out framework: " + isOptOut)

             if (isOptOut) {

               const val = e.detail.consent.status == 'ALL_DENIED' ? false : true

               syncTrackingConsent({

                 analytics: val,

                 marketing: val,

                 preferences: val,

                 sale_of_data: val

               })

             } else {

               syncTrackingConsent({

                 analytics: analyticsConsent,

                 marketing: marketingConsent,

                 preferences: preferencesConsent,

               })

             }

           } else {

             throw 'No DPSs found (Shopify Analytics, Shopify Marketing, Shopify Preferences)'

           }

         })

       }

     )

   </script>

 <!-- Usercentrics Embed Script -->

 <link rel='preconnect' href='//privacy-proxy.usercentrics.eu'><link rel='preload' href='//privacy-proxy.usercentrics.eu/latest/uc-block.bundle.js' as='script'><script type='application/javascript' src='https://privacy-proxy.usercentrics.eu/latest/uc-block.bundle.js'></script><script id='usercentrics-cmp' src='https://web.cmp.usercentrics.eu/ui/loader.js' data-settings-id='XXXXXXXX' async></script><script>uc.setCustomTranslations('https://termageddon.ams3.cdn.digitaloceanspaces.com/translations/');</script>
NOTE: towards the very bottom of this script, you need to replace “XXXXXXX” with your UsercentricsID. This can be found on the Embed Codes page of your Termageddon license.
Click Save.
Stage 3: test
- Visit your Shopify store's website and open the Developer Tools console.
- Confirm that you see the log message: "** Shopify Consent Tracking API loaded"
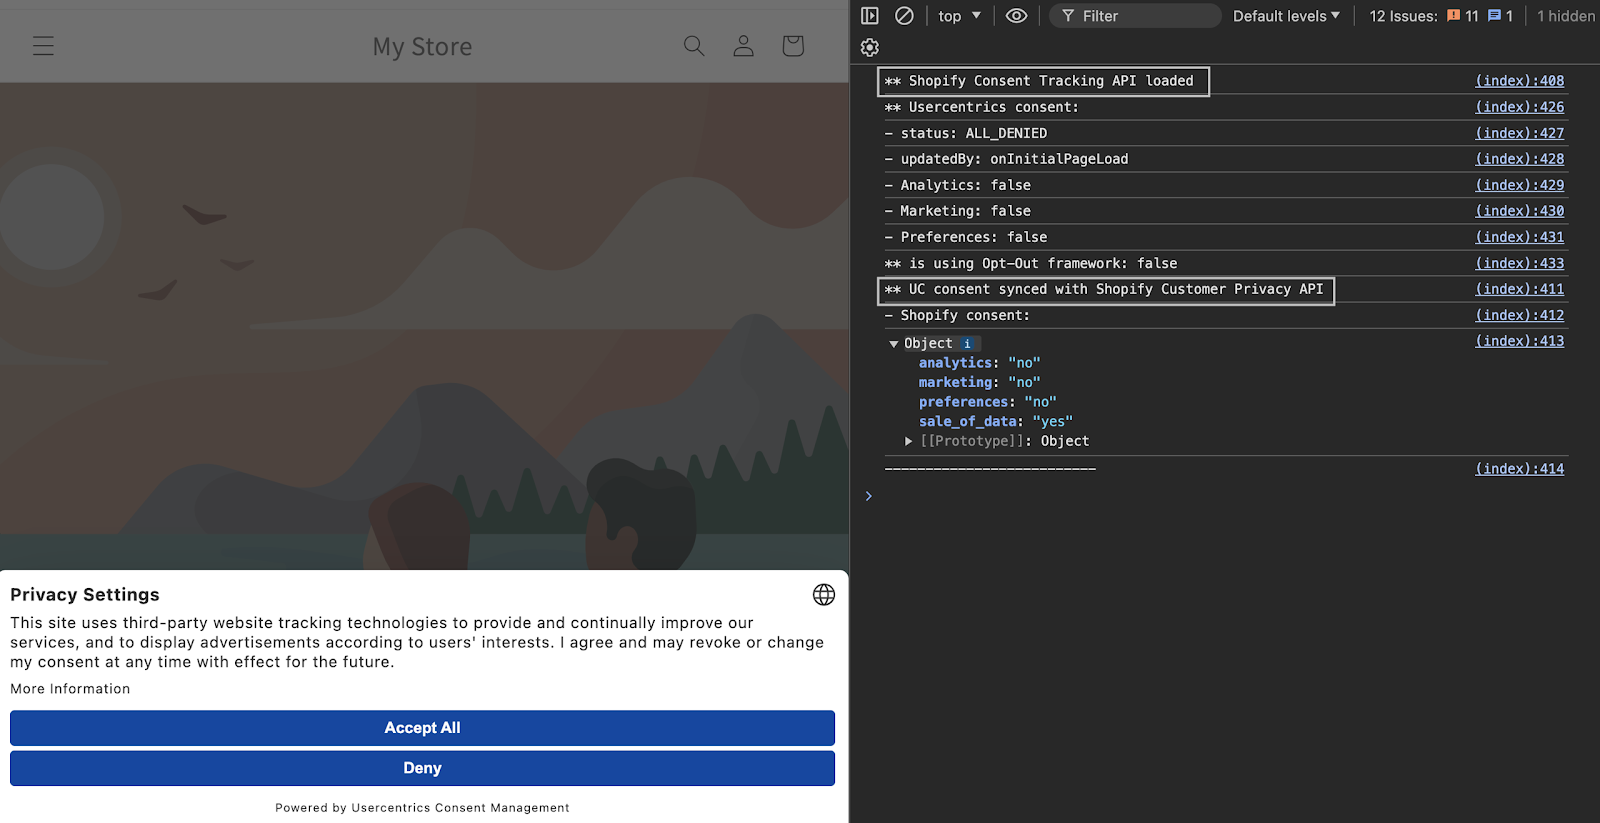
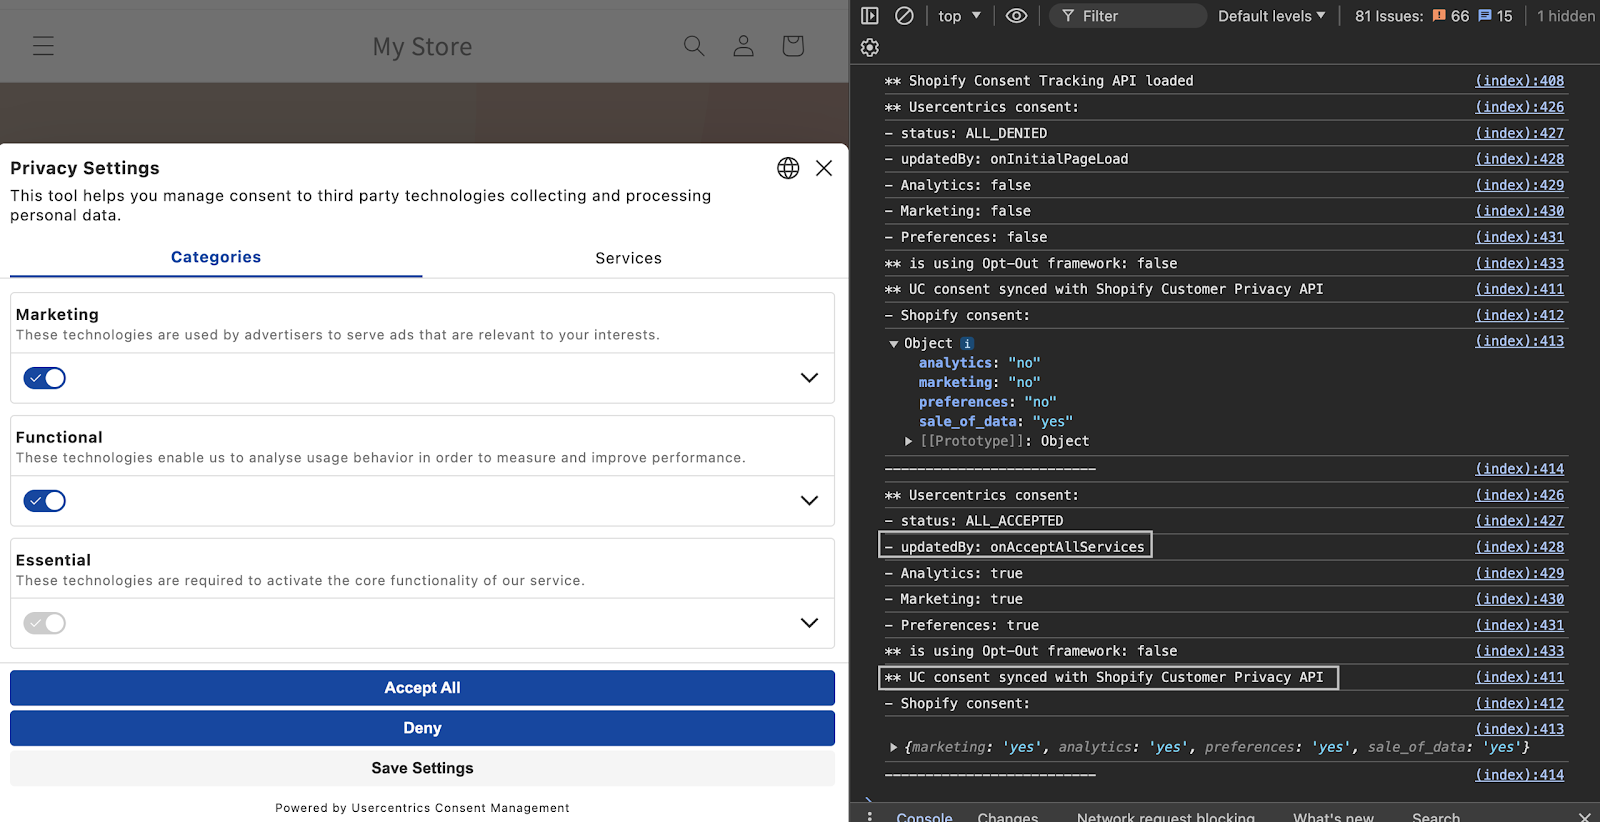
Open the Usercentrics banner and modify your consent preferences.
Verify that the console displays the log: "** UC consent synced with Shopify Customer Privacy API," along with the consent details, ensuring it is properly synced.
NOTE: If you are loading additional third party scripts in your Shopify store (such as Google Analytics), you may need to add them below the Usercentrics script in your theme.liquid file (instead of using an app from the App Store). To determine whether this extra step needs to be taken, you need to test your consent solution. Here is a guide on how to test non-essential third party scripts (such as Google Analytics, Facebook Pixel, etc.).
Was this article helpful?
That’s Great!
Thank you for your feedback
Sorry! We couldn't be helpful
Thank you for your feedback
Feedback sent
We appreciate your effort and will try to fix the article
